How to Take Digital Photos of your Model Airplane

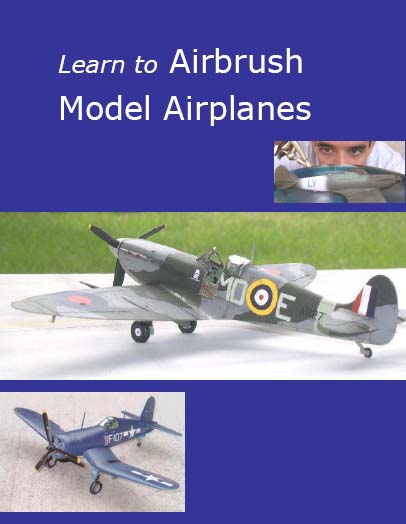
Above: P-51D Mustang (Tamiya 1/48 kit) modified with free-spinning prop. Photographed with Nikon Coolpix 4300, natural outdoor light, auto-exposure mode.
Introduction
Now that you've built and painted your masterpiece, you'd like to take photos to share with your friends and family. A good photo can really enhance the quality of a model airplane. If you've admired some of the photos on our site and wondered how we do it, here's how.
Camera
We used a Nikon Coolpix 4300 digital still camera for all of the pictures on our site. This 4 megapixel camera has a high quality lens, 3x optical zoom, and takes great pics. It has an Auto mode if you like to take simple, one-button pictures. If you prefer to have more control over your photo, it has a Manual mode with lots of features. There is also a 40 second Movie mode (no sound).

Above: Nikon Coolpix 4300 used for our photos.
One feature that is almost essential for taking photos of small scale models is a Macro mode, and this camera has it. Macro (close-up mode) allows you to get in close for those cockpit close-ups.
Another very useful feature is the countdown Timer. Pressing the shutter with the timer activated gives a 10 sec delay before the photo is taken.
With the camera placed on a tripod (note: tripod mounting hole also very useful!) this means less chance of the camera being inadvertently moved while trying to press the shutter. This is especially important when trying to achieve large depth of focus photos...
Large depth of focus means that most of the image, in front of and behind a central point, is in focus. This is good, because the viewer can see many features of the model in one photo. To achieve this, use the manual controls of the camera to reduce the aperture, i.e. increase the "f-stop". What this does physically is reduce the size of an aperture (opening) in front of the lens. This increases the depth of focus, but also reduces the amount of light reaching the sensor ("film"), so the shutter must stay open longer to compensate. The longer the shutter stays open, the greater the risk of camera shake causing a blurring image. The moral of the story is that a camera with a timer and a tripod are helpful to get good model airplane photos.

Above: F4U-1D Corsair (Tamiya 1/48 kit). Photo in macro (close-up) mode.
Composition
You'll need some type of appropriate surface and a background. You can photograph your model on your workbench, carpet, patio, etc. Remove extra items from the area and from the background, as these will distract the viewer's eye. We do recommend that you take some extra steps to get a realistic surface and background; these can be re-used for many models.
We used a painted tarmac for the surface in the Mustang photo above. This was just a piece of white foam board (from the craft store), with scale squares drawn on it. The lines were pre-shaded with medium gray, then the whole thing airbrushed with light gray. A yellow runway line was sprayed after masking off the area. The obligatory cracks (pencil lines) and oil spills (thinned black paint droplets) were then added.
The board was placed on a low table, with a background of (full-scale) lawn grass. The grass was far back enough (3-4 yards) to be out of focus, giving a general "green field" effect. Other very effective backgrounds include light blue construction paper (sky), or a large scenic photo. Scale trees, shrubs or even sheets of grass are available in the model railroad section of the hobby shop, and can also be used to great effect.
The camera was placed on a tripod, and kept at a low angle relative to the airplane, to give roughly a scale eye-level perspective to the shots. Higher angle shots are good for showing off the upper surfaces of the plane.

Lighting
Our favorite lighting is natural light, partial shade on an outdoor patio. Avoid direct sunlight and its harsh shadows. The best times of days for outdoor shots are early morning or late afternoon, when the sun is relatively low in the sky.
Sunlight can also be used effectively indoors, if you have a large glass door or window. In this case, the light may be somewhat one-directional, so try supplementing it with a lamp or reflecting white board.
Studio light could be used as well. Use at least two lamps illuminating the model from different directions, to help eliminate distracting and detail-hiding shadows.
Below: Four (4) compact fluorescent lights in a photo booth illuminate this scene. Pilot has driven up to his P-51D airplane in his Mercedes sports car. If you are interested in building model cars, check out Model Car Tips.

Shooting
If your camera has a timer mode, use it. In combination with the tripod, this will prevent any camera shake from low shutter speeds that may be necessary in low-light or close-up situations.
If using a spinning prop, turn on the dryer and move it slowly into position. The prop will get up to speed fairly quickly. Hold the dryer in place while taking the shot.
Do several takes, giving yourself more material to work with in the "editing room". Vary the angles, zoom, etc. Since there is some effort involved in setting up the shoot, get several shots so that you can choose and refuse (digital "film" is cheap).
A few words on file size. You can get 4 mega-pixel shots of your airplane if you plan to make high-quality print enlargements. That will generally be overkill for website display or sharing via email. Many websites where photos are shared have limits on size of photo that can be uploaded. We set our camera at the "Normal" quality and 640 by 880 image size, to get images that are less than 100Kb. We also create thumbnail images of even smaller file size (using Photoshop) for web pages that have lots of images on them, so that the page does not take forever to load. The message here is that setting the image quality/resolution of your camera to the maximum, may result in pics that need to be edited down anyway. More on editing below.
Editing
There are various photo editing programs available, many with similar features. We use Adobe PhotoShop 7.0. Here are some of the features that you should explore in your editing software.
Crop - You will generally need to crop your photos, sometimes only slightly, to remove excess background. Good cropping can turn a mediocre photo composition into an excellent one.
Brightness - Digital photos often seem darker than at the time of shooting. Increase the Brightness (sometimes called Level) as needed.
Contrast - Not used as often as Brightness adjustment, but still fun to play with.
Special Effects - You may be able to add special effects such as grayscale (black and white), sepia tones, artificial aging, soft focus, halo effects, solarization, etc. Experiment a bit.
Size - As mentioned above, you may need to reduce your file size for practical reasons. Cropping is one way, but sometimes you just want to reduce the file size. Many editing programs give you the option to do that. When saving the file, you can set a reduced image quality, which translates into a smaller file size. The image quality reduction may not be visible on a computer screen. You may also be able to reduce the image size, by setting the number of pixels width and height shown in the image. This reduction in pixels also reduces the file size.
File Format - The common image format is jpeg, so save in that format if your program allows. The gif format is also fairly common.

Above: Spitfire Mk Vb (Tamiya 1/48 kit). Sepia tone and film grain added in Adobe PhotoShop 7.0.
Send us your comments below! Login with your Facebook, Twitter, Google or Yahoo account.